
Horny Feed Takeaway


Friday, 27 January 2006
Thursday, 26 January 2006
Wednesday, 18 January 2006
Do you know any good Mp3 host service?
 NSFW Reddit!
I have tried my hands on a lot of hosting websites to host my mp3s so that I can stream them on my blog.
So far yet to find a satisfying service.
Anymore know any website can host mp3 and offer quite a lot of bandwidth.
I want to stream music over my blog for a long time.
We all know Flickr hosts photos brilliantly and youtune does a great job hosting video. But the question
is who hosts MP3 for us?
Pictures and photos are all taken care of. Now It's time to take care of our Music.
Please Head over to my guest book Guestbooklive.blogspot.com to give me some advice. Thanks a million.
You also can request what music I should stream over my readio.
![]()
Rate It/おすすめ度
Leave You Comment/コメント
My Guest Book live
NSFW Reddit!
You can go and sign my guest book over here. JUst Click on AnDriana and you'll be there.
Guestbooklive.blogspot.com
Update: Now it's Omarion's Hot New Release "21" on the radio right now. Enjoy it!
Want your own sexy music radio like mine. Go and grab your own Tune Feed. www.TuneFeed.com
![]()
Rate It/おすすめ度
Leave You Comment/コメント
Luther Vandross--My Live Radio Debut
NSFW Reddit!

Look at the right side bar, you'll see my radio is alive and kicking.
Today the music on the air is Luther Vandross's self-titled Jive Record Debut Ablum "Luther Vandross"
Luther Vandross
Luther Vandross
Release Date: June 19, 2001
Label: J-Records
Rating:
Luther Vandross made a return to form, of sorts, with his 2001 self-titled album, and his first bow for former Arista chief Clive Davis' new label, J Records. Luther Vandross ranks as the singer's best since 1991's critically and commercially lauded Power of Love, and it produced the single "Take You Out," which proved to be the velvet-voiced crooner's first Top 40 pop hit since "Endless Love," his drippy hit duet with Mariah Carey from 1994's covers collection Songs. Luther Vandross employs a bevy of the day's hottest producers and songwriters, in an effort to bring Luther back into the mainstream, and for the most part it works, although it infuriated more than a few old-school purists. Luther effortlessly brings on the funk on stellar up-tempo tracks, such as "Grown Thangs," the neo-disco of "Say It Now" (which recalls his classic "Never Too Much"), and the fabulous "How Do I Tell Her," the latter two utilizing a long standing trademark of Vandross' stellar female background vocals that nearly steal the show. The album also includes the classic ballads -- lush, romantic quiet storm numbers such as "Hearts Get Broken All The Time," the melodic "I'd Rather," "Any Day Now," and "Love Forgot." Additionally, Vandross delivers an inspired cover of the Burt Bacharach/Hal David classic "Are You There (With Another Guy)," The album's second single, "Can Heaven Wait," is a lush ballad that was destined to become a massive hit, but, unfortunately, due to the overly melodramatic nature of the song, which recalls R. Kelly at his schlockiest, the single stiffed. Nonetheless, Luther Vandross is the singer's most engaging, exciting, and compelling album in years, and shows Vandross in step with changing times, all the while still managing to hold on to the essence of what made him so famous in the first place. Jose F. Promis, All Music Guide
Tracks:
Title Composer Time
Tracks
|
|
|
|
|
|
| |||||||||||||||||||||
| | | 1 | | Take You Out | Campbell, Lilly, Smith | 3:25 | |||||||||||||||||||||
| | | 2 | | Grown Things | B., Babyface, Vandross | 4:32 | |||||||||||||||||||||
| | | 3 | | Bring Your Heart to Mine | Berkeley, Gist, Huggar ... | 4:21 | |||||||||||||||||||||
| |||||||||||||||||||||||||||
| | | 4 | | Can Heaven Wait | Karlin, Mercado, Patrick ... | 5:35 | |||||||||||||||||||||
| |||||||||||||||||||||||||||
| | | 5 | | Say It Now | Butler, Campbell, Gordon ... | 4:32 | |||||||||||||||||||||
| |||||||||||||||||||||||||||
| | | 6 | | Hearts Get Broken All the Time (But the Problem Is, This Time It's ...) | Vandross, Vertelney | 5:19 | |||||||||||||||||||||
| | | 7 | | I'd Rather | Crawford | 4:51 | |||||||||||||||||||||
| | | 8 | | How Do I Tell Her | Lawrence, Richardson | 4:17 | |||||||||||||||||||||
| | | 9 | | Any Day Now | Bacharach, Hilliard | 5:11 | |||||||||||||||||||||
| | | 10 | | If I Was the One | Warren | 4:19 | |||||||||||||||||||||
| | | 11 | | Let's Make Tonight the Night | Ferrell, Lighty, Lighty ... | 4:17 | |||||||||||||||||||||
| |||||||||||||||||||||||||||
| | | 12 | | Like I'm Invisible | Rideout, Thornton, Vandross | 4:00 | |||||||||||||||||||||
| | | 13 | | Are You There (With Another Guy) | Bacharach, David | 5:55 | |||||||||||||||||||||
| | | 14 | | Love Forgot | Miller, Vandross | 3:20 | |||||||||||||||||||||


![]()
Rate It/おすすめ度
Leave You Comment/コメント
Tuesday, 17 January 2006
How to: Share your music via iTunes on the Net
NSFW Reddit!
After much frustration, I've finally set up my new mac mini to stream all my music to my work laptop. I say frustration, because whilst there is plenty of help out there, none of it in itself was complete enough to get me up and running. Some where too mac to mac, some to unix to mac, some unix to windows. Nothing really gave me the step by step, follow this and it will work guide.
So, I present "The definitive guide to setting up iTunes streaming via the internet from a Mac running OSX to your PC running windows". Phew that’s a mouthful.
The Short Guide
- Turn iTunes sharing on
- Turn on remote login
- Open up the Mac firewall on ports 22 & 3689
- Forward port 22 on your router to your Mac
- Download and install SSHTunnelClient
- Setup a SSH Tunnel from your PC to your Mac
- Download and install Rendezvous Proxy
- Setup an iTunes daap listener
- Open up the PC firewall on port 3689
- Open iTunes, listen to music over the internet
Essentially what we are going to do, is create a SSH tunnel between the local (windows) and the remote (mac) machines. When then fool the local machine into thinking that the remote machine is local, and whammo we have music.
The Long Guide
- Turn iTunes sharing on, so that iTunes can stream music out.
Open iTunes, go to preferences, go to sharing. Click "Share my music" and choose to share your whole library or only selected playlists, as you like. Give it a name (and a password if you like) and you're good to go. - Turn on remote login, so that we can access the Mac over the internet.
Go to System Preferences, go to Sharing. Under Services make sure "Remote Login" is checked. This essentially turns on the Macs built in SSH service/daemon, because it's Unix under the hood after all. - Open up the Mac firewall on ports 22 & 3689, so that we don't get rejected accessing the Mac or the iTunes stream.
Go to System Preferences, go to Sharing. Under Firewall make sure it's either off (highly unadvisable) or that "Remote Login - SSH (22)" and "iTunes Music Sharing (3689)" are checked. - Forward port 22 on your router to your Mac, so that we can get through the NATing most routers do.
Log onto your router and find the NAT settings. Set up your router to forward any traffic coming in externally on port 22 to go to your Mac. On my router this involves putting in my external IP address (found using whatismyip, port 22, my internal IP (which I've set in the router DHCP not to expire) and port 22. Now if your broadband provider gives you an dynamic non sticky IP address, you'll have to change this when it changes. Also if you're using DHCP internally, either configure you Mac manually with an IP address or configure your router not to expire the Mac's IP address. I'm assuming you're running a DSL or Cable connection and using NAT to connect your machines at home. If not make sure that hitting your home network on port 22 hits the Mac on port 22. - Download and install SSHTunnelClient, so that we can easily create an SSH tunnel. Think of this tunnel as a virtual pipe between the two machines. Now we can either set it up manually using command line applications like putty or plink, or we can install cygwin and run ssh 'natively'. However this is like serious hassle, and I've always preferred a good GUI. Not withstanding some bits of the application being in German, SSHTunnelClient is a very good app. Easy to use and minimizes to the system tray means there is no need to leave messy client applications or command windows open.
- Setup a SSH Tunnel from your PC to your Mac, so we can link our machines securely. Using SSHTunnelClient makes this a dream. Click Tunnel, Add, and create a tunnel with the following settings
- Tunnel Name - iTunes [or whatever you want to call it]
- SSH Host - xxx.xxx.xxx.xxx [put the IP address of your home Mac here]
- SSH Port - 22 [i.e. the official SSH port]
- Local Port3689 [i.e. the iTunes streaming port that iTunes is going to look for locally]
- Remote Host - 127.0.0.1 [i.e. the tunnel ends locally (127.0.0.1 being localhost) on the remote machine, not bounced onto some further machine]
- Remote Port - 3689 [i.e. the iTunes streaming port that we are going to connect to on the remote machine]
- Username -
[put your Mac login name here] - Save Password - Tick/Untick [Ticking this and putting your password in below means you don’t have to login everytime, but also means anyone who has access to your PC can access your Mac]
- SSH Key File - Leave blank [You can create key files that do the login and authentication using secure keys without you having to enter a password. I might figure out how to do this sometime but your password is pretty secure in the SSH pipe]
- Forward - Local to Remote [i.e. poking on the local port forwards us to the remote port]
- Auto connect - Off [Although if you want it to connect automatically on load set this on]
- Compression - On [You could turn this off if you want, it wont make any difference to the music I would surmise, but might make the control commands quicker]
- Do Keep-Alive-Ping - Off [I have this off, if your connection keeps dropping try turn this on]
- SSH1/SSH2 - SSH2
Drop to dos (Windows Start, Run, cmd) and type "telnet 127.0.0.1 3689". This creates a telnet session to the local machine on port 3689. If our tunnel worked we should be shunted through the virtual pipe to the remote mac, and the screen should go black. Hit enter twice and you should see
 HTTP/1.1 400 Bad Request
Date: Sat, 12 Mar 2005 21:08:37 GMT
DAAP-Server: iTunes/4.7.1 (Mac OS X)
Content-Type: application/x-dmap-tagged
Content-Length: 0
This is good, and means we're hitting the iTunes streaming server on the Mac. If you don't get this you have a problem, and you better figure it out, cause there is no point proceeding otherwise. - Download and install Rendezvous Proxy, so that our local iTunes thinks the remote iTunes is local. This is a little Java application that proxies Apples Rendezvous network technology. Without this our local iTunes would have no idea that the remote iTunes exist.
- Setup an iTunes daap listener, so that iTunes can see the remote steaming iTunes. Run RendezvousProxy. Click "Add Host", and add one with the following details
- IP Address - 127.0.0.1 [i.e. look locally (and that’s where it will find the tunnel we set up)]
- Port - 3689 [i.e. look locally on that port and magically be transported through the tunnel as we proved with our telnet test above]
- Host Label - iTunes Streaming via SSH Tunnel [or whatever you want to appear in iTunes]
- Service Text - Leave blank [or whatever 'notes' you want to make]
- Service Type - _daap._tcp. (iTunes Host) [i.e. The Rendezvous service we are proxying.]
- Open up the PC firewall on port 3689, so that we don’t block the incoming stream. If you're running a firewall locally (and if you have XP SP2 you probably are), turn it off. Get the streaming working and then turn it back on. The streaming should fail. Then open up port 3689. If you still have problems try opening up port 5353 (UDP) as well, although I think this is only needed when sharing music from a windows machine.
- Open iTunes, listen to music over the internet, so that we can access all our music at home. In iTunes you should see a blue playlist under the green ones for music store and purchased music. Click on it and the system will churn for a while depending on how big your remote playlist is. I'm not sure how much of the full playlist it needs to bring across, but it's a big enough chunk. My playlist is 6.5mb and this takes a minute or two for me, so give it time. If you want to check that it's doing something open up task manger, and click on the networking tab. You should see a whole stack load of activity. After a while the name in the blue playlist should change to the name you set in iTunes in step 1 and a grey arrow should appear next to the name. Clicking the arrow should show you all your playlists, and clicking on a song or a playlist and hitting play should give you music
Other notes
- Turn of sharing on local machine if you are having problems. I read that this can be an issue on windows. I've also read there are ways to give everyone on your local lan access to the stream via your iTunes, but your on your own figuring that one out.
- UPDATE - Rendezvous Proxy does this and actually broadcasts the beacon locally, so that others (on your local lan) can see it. Although it wont work with the beacon created above as that points locally (127.0.0.1) and other peoples machines wont have the SSH pipe. I think you need to create another one with your local IP address for this to work. I think. I'm not sure how well this works (so far tests have failed) and remember you only have so much bandwidth
- If iTunes keeps lossing the connection, directly after retrieving the full list from your remote machine, reboot. Don't know what the problem was, but it worked for me.
- Remember that you are streaming music. So if you have a 256kb uplink on your DSL and you try streaming a file ripped at 320kb you're going to have a problem. You can try setting your buffer size to be larger, but I don't know what the buffer size is actually so I don't know how much of an effect this will have. I would set the buffer size to be larger anyway (iTunes, Preferences, Advanced, "Streaming Buffer Sized".
- UPDATE - I have a 256kb connection and anything above 128 needs to constantly rebuffer. I'll be getting a 400kb uplink on thursday so hopefully that will stream better.
- You can do the same thing running your remote server on unix or windows. On unix you need to set up Multi-Threaded DAAP Daemon and on windows you need to have a SSH server running. Poke around on google for one.
I suspect none of my regular readers will care much about this, but it took me ages to figure out how to do it. So maybe this will help someone else out who arrives via google. Let me know if you find any better way to do this or if it helped. I'm sure there are mistakes in my guide, let me know if you see them
New Notes
- 09/09 - Apparently there are problems with iTunes 5.0 and sharing. This is because a change to the daap stuff so that Rendezvous Proxy doesn't work with iTunes 5 client. If you want to do this you need to make sure you don't upgrade your client. You can upgrade your server fine. I'm running 5.0 as my server on the mac and 4.9 as my client on windows and that tested fine. If anyone has the solution to using 5.0 as a client, let me know.
- 30/11 - The same holds true for iTunes 6.0. If you want this to work you need to use iTunes 4.9 as the client. I still can't find a solution, although I believe the MT-DAAPD people have a fix, but Rendezvous Proxy hasn't been updated in like forever. As soon as I have time to poke around and find a solution, I'll let you know.
![]()
Rate It/おすすめ度
Leave You Comment/コメント
Monday, 16 January 2006
How to Share Your iTunes music over the internet
NSFW Reddit!
A few hours ago I was searching for a way to share my music itunes library with some friends. After trying some different options I think I found the best one. Hamachi allows you to share your iTunes library with a few mouse clicks (and only with people you know so it won’t destroy your bandwidth).
The requirements:
- iTunes (http://www.apple.com/itunes/)
- Hamachi (http://www.hamachi.cc/)
Preperation:
1. Install and open Hamachi.
2. After following the brief on screen tutorial and create a new network by clicking on the bottom-middle button.
The guide:
1. Open iTunes and Click Edit>Preferences>Sharing.
2. Click the ‘Share my music’ checkbox.
3. Now give the name of your network along with the passowrd to someone you know, let him join your network and start iTunes. If he or she also follows the previous two steps (not the netwrk creation) you will also be able to listen to his/her music!
Troubleshooting
Q: I cannot see any shared music?
A: Two solutions:
1. restart iTunes (simple, isn’t it?)
2. In iTunes click Edit>Preferences>Sharing and click the ‘Look for shared music’ checkbox
Yesterday I posted a way to stream your iTunes library over the internet. This post has been warmly welcomed by most of you so I decided to write a part 2. It is easy to download the shared music from the network.
To do this, simply download ourTunes from http://ourtunes.sourceforge.net/ (if you are running windows, download the executable).
Log on to your hamachi network (click here to read part 1) and start ourTunes. It will automaticly connect to all hosts available. Click ‘File > Download Directory’ and set the download dir.
To download, select the songs you want to download, right click the selection and choose ‘download’.
As you see on the screen below, there are networks containing 17000+ songs.

![]()
Rate It/おすすめ度
Leave You Comment/コメント
Thursday, 12 January 2006
PUT A CUSTOM WATERMARK ON YOUR VIDEO
NSFW Reddit!
This guide will enable you to place a watermark over an existing video. This watermark can be text, or an existing image. Please note that some basic working knowledge of VirtualdubMod would be an advantage, but not a necessity. If you wish to add a watermark, you must re-encode your video, so it is suggested that you would use this guide immediately after acquiring your source, just before you are about to re-encode your output.
Tools Required:
VirtualDubMod
Image manipulation/creation software (Windows Paint will do the job)
Optional - Donald Graft's logo filter (only required for Part 2 of this guide)
PART 1: WATERMARK PRESENT FOR ENTIRE VIDEO
In this part, I'll show you how to place a watermark in your video for the entire duration of the video. If you wish to only have your watermark visible for certain parts of the video, or you wish to configure a number of different watermarks at different time intervals, please see Part 2 at the end of this guide.
1. PREPARE YOUR WATERMARK IMAGE
a) If making a text watermark:
Open up your favourite image manipulation/creation program. Create a new image – I’d suggest a canvas size of 200 (width) x 20 (height) as a good starting point, but you can use whatever you like, just bear in mind how it will look and fit on the screen. Use your image software to paint the background black. Now create the text you wish to appear in the watermark, and place it on the black background, making sure that the text colour is white. Once finished creating your watermark image, save it, but make sure that you save it as either a .BMP or a .TGA file.
b) If you are using an existing image:
Simply open the image, and make sure you save it as a BMP or TGA file.
Please note:
It is imperative that you save your watermark as either a .BMP or a .TGA file, as these are the only file formats virtualdubmod will accept for watermarks.
Some examples of watermark images appear below:
Text:
Existing image:
2. SET UP VIRTUALDUBMOD
Open Virtualdubmod, go to File > open video file: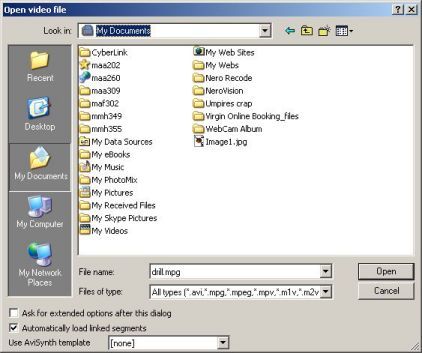
Select your source video and press the Open button.
You should now have something similar to the following: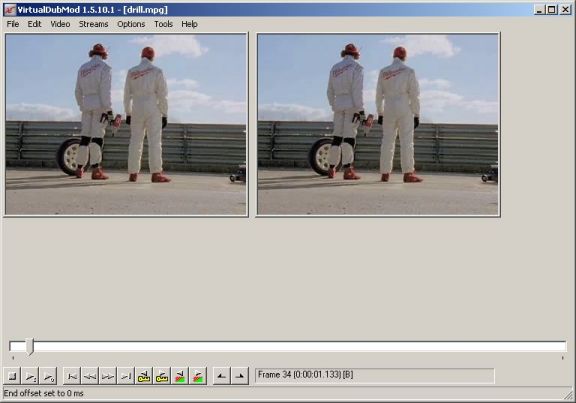
Go to Video > Filters: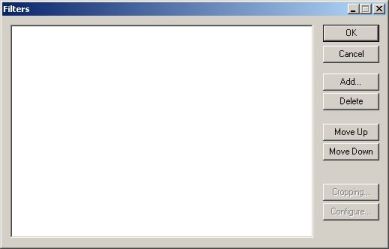
Click the Add button, scroll down to the logo filter: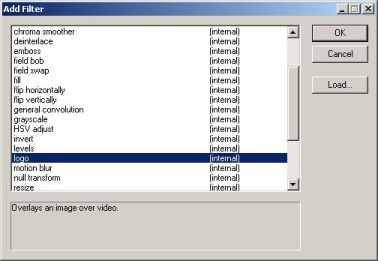
Click OK.
You should now have something similar to the following: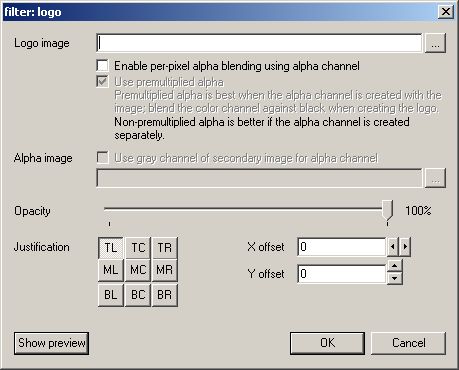
Press the … button to the right of the Logo image field and select your watermark image.
Tick the enable per-pixel alpha blending using alpha channel tickbox.
Leave the Use premultiplied alpha tickbox ticked.
Tick the use gray channel of secondary image for alpha channel tickbox.
Press the … button to the right of the Alpha image field and select your watermark image.
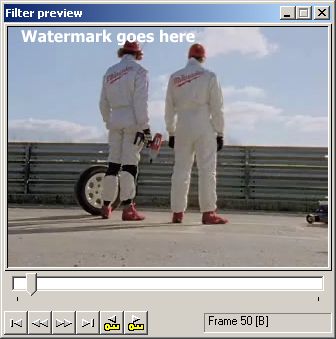
Click the Show Preview button, and you should have something similar to the following: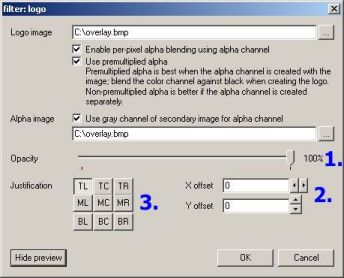
1. corresponds to the opacity of your watermark, This control how “see-through” your image is. I’d recommend a value of 50% if you wish the background to show through from behind the watermark. Your changes are automatically updated in the preview window, so you can quickly see the results of your actions.
2. corresponds to the manual adjustment of the positioning of the watermark, where X offset is the distance from the left of the video, and Y offset is the distance from the top of the video.
3. corresponds to the preset adjustment of the positioning of the watermark. TL stands for Top Left, MC stands for Middle Centre, BR stands for Bottom Right …… and you get the idea.
Please Note:
If you have used the manual adjustment, this will also affect the presets, so if you change your mind and decide to use a preset instead of manually adjusting the placement of the watermark, make sure you set both the X offset and the Y offset back to 0, otherwise you might get some unexpected results.
Once you are happy with your settings, click OK, and then OK again.
You should now have the following: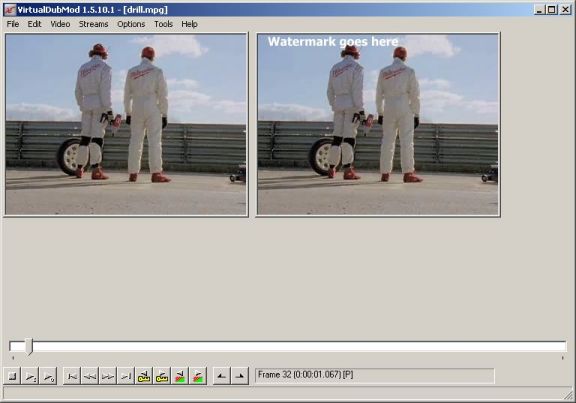
Now you can set up your video with any encoding settings you desire as per normal. Once you have selected your compression settings for both video and audio (if required), Go to File > Save As, specify your output filename, and click the Save button, or start the frameserver if you’re frameserving to an MPEG encoder.
Now some examples with opacity set at 50%:
Text:
Image:
PART 2 (OPTIONAL): CUSTOM DURATIONS FOR LOGO(S) / MULTIPLE LOGOS
In this section, you'll be able to set custom durations for one or many watermark logos/text.
Download Donald Graft's logo filter and extract all files in the Zip file into your Virtualdubmod\plugins directory.
Go to Video > Filters.
Click the Add button.
Click the Load button.
Browse to your VirtualdubMod\plugins directory, select the logo.vdf file and press OK. Scroll down through the list of filters until you find logo (1.4), click on it, and press OK.
You will be presented with the following: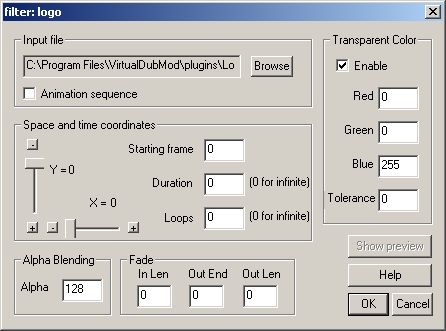
I found the help file so descriptive that IMO it would be very beneficial for me just to post the entire contents of it here:
| : |
| This filter provides the ability to overlay a logo contained in a bitmap file. The position of the bitmap may be specified. Selectable alpha blending allows variable merging with the video, and a transparent color may be selected to obtain a free-floating effect. Animated logos can be created by defining a series of bitmaps. Filter preview is supported. This filter is ideal for unobtrusively placing a logo on the video as is done on many cable TV channels. Two test bitmaps and an animated bitmap sequence are provided in the zip file. How to Make a Static Logo Create a 24-bit-depth windows bitmap file with the desired size and with a transparent color zone if desired. The transparency color may be arbitrarily selected and then configured in the filter configuration. In the filter configuration dialog box, enter the input file. If the specified bitmap file cannot be found, or if it is not a bitmap file, or if it is of the wrong depth, the output frame will be all black. Set the desired X and Y coordinates, the starting frame and the duration (in frames). Set the desired alpha blend and transparent color. How to Make an Animated Logo To make an animated logo, create a series of bitmap files named name0000.bmp, name0001.bmp, name0002.bmp, etc. (you can replace "name" with desired text). Specify the first one as the input file and check the 'Animation sequence' checkbox. Set the duration to be the number of frames to display each bitmap file before moving to the next one. Set the loop count to the number of repetitions desired for the sequence. Set the other parameters as described for static logos. Note that stepping forward and rewinding will operate correctly, but stepping backward is currently not supported. A sample sequence is provided that produces a spinning earth. To run it, set the duration to 1, loops to 0, and enable a transparent color of 0/0/0. Detailed Option Descriptions The following options are provided: Input file: Specifies the full pathname of the bitmap file to be used. Animation sequence: Check this to enable an animated sequence. X: This option determines the X offset of the start of the bitmap on the video. Y: This option determines the Y offset of the start of the bitmap on the video. Starting frame: The frame number on which to begin displaying the logo. Duration: For a static bitmap, the number of frames for which to display the logo. For animated bitmaps, the number of frames to display each bitmap before moving to the next bitmap. To display a bitmap for the whole clip length, select 0. Loops: For static logos, this has no effect. For animated logos, the number of repetitions of the bitmap sequence. To loop forever, select 0. Alpha: This option determines the blending of the bitmap with the video. For full bitmap and no video, use the value 255. As this value is reduced toward 0, more and more of the video is blended in. An alpha of about 100-128 gives a nice unobtrusive overlay. Fade: These options allow for the logo to be faded in and/or out. For fade-in, the starting frame number of the fade is determined by the logo starting frame. The length of the fade is determined by the In Len value. For fade-out, the ending frame number of the fade is determined by the Out End value. The length of the fade is determined by the Out Len value. If fade-in and fade-out overlap, fade-out overrides. Even if the logo is otherwise enabled such that it would appear beyond the end of a fade-out if the fade-out were not there, the logo will be suppressed after the fade-out. Finally, if you put silly values in the fade boxes, you will get what you deserve. Enable transparent color: Check this if you have made a transparent color zone in your bitmap. Then select the transparent color in the Red, Green, and Blue edit boxes. Full video shows in the transparent areas. The tolerance box allows you to specify a 'sloppiness' factor fo the match to the transparent color. As long as the difference between each color channel and the corresponding specified transparent color is not greater than the specified tolerance, then the color will be considered to be transparent. For example, if the tolerance is 10 and the specified transparent color is 37:45:10, then a color 39:44:5 will be considered transparent, while a color 39:56:11 will not be transparent (because one color channel's difference exceeds tolerance). |
Knock yourselves out ! Read More......
![]()
Rate It/おすすめ度
Leave You Comment/コメント
Subscribe to:
Comments (Atom)


